Monday, December 9, 2019

My 3 takeaways

The first important thing I learned in this class is the exposure triangle and how to apply it when shooting. Setting my camera in manual mode and adjusting the aperture, shutter speed, and ISO to properly expose my picture or make cool effects like the one below are vital in my progression as a photographer. Before I would just set my camera to auto and many times, I would end up with photos either under or overexposed, grainy, or not have what I want in focus. 


The second important thing I learned was how to effectively use lightroom to greatly improve my photos. This involved getting rid of distractions, frame the photo better, bring out detail, and bring out the colors that get lost sometimes in the raw image. Knowing the rules of dominance really helped with this. I did a blog post that shows comparisons and goes more into this, linked below. 


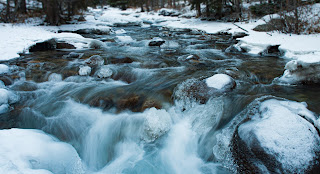
My final takeaway was not something directly taught to us in class, but something I discovered while trying to get 25 photos I like for my final in this class and looking at my classmates' photos. This is the fact that you can get great photos with a limited ability to travel, both because of money and available free time. I used to think to get great shots you need to travel to some amazingly beautiful place, but I realized that is simply not true. If you put some thought into what you shoot, frame it properly, edit, and use some creativity you can make some good pictures. in your local area. My photo, which is below, I believe is an example of this. For this, I just drove a little south of billings, stopped my car and took this photo.

Final

Every photo is taken on a Nikon D5000 with a Nikon AF-S DX Nikkor 18-70mm F/3.5-4.5G IF-ED lens.


 1.6 sec, f/10, ISO 2OO,18mm
 1/200, f/22, ISO 200, 18mm
  1/200, f/22, ISO 200, 18mm
 1/250, f/4.5, ISO 200, 70mm
  1/250, f/4.5, ISO 200, 70mm
   1/250, f/4.5, ISO 200, 70mm
 1/640, f/8, IS0200, 18mm
 1/250, f/11, ISO 200, 18mm
 1/40, f/111, ISO 200, 18mm
 1/250, f/11, ISO 200, 40mm
 1/50, f/22, ISO 200, 18mm
 1/25, f/22, ISO 200, 18mm
 1/80, f/22, ISO 200, 70mm
  1/80, f/22, ISO 200, 70mm
 1/50, f/22, ISO 200, 48mm
 1/3, f/22, ISO 200, 18mm
 1/30, f/22, ISO 200, 18mm
1/80, f/8, ISO 200, 18mm
 1/80, f/18, ISO 200
 1/60, f/18, ISO 200, 70mm
 1/640, f/3.5, 18mm
 1/60, f/18, ISO 200, 48mm
 1/80, f/22, ISO 200, 56mm
 1/60, f/29, ISO 200, 40mm
1/60, f/22, ISO 200

Wednesday, December 4, 2019

Michael Kenna

One of the popular landscape photographers I like is Michael Kenna. One of the reasons his work is some of my favorites is his unique style. He shoots in almost all black and white and all of the seen are very simple and minimalistic. Below are two great examples of this.


His work is inspiring and beautiful to me because he manages to make such powerful images while keeping it so simple, colorless and minimal. He proves that you do not need big glamourous and beautiful landscapes in perfect conditions at the right time to shoot great photos. It proves you can make great photography in your local area of almost anything. Another thing I like is how he has galleries from places he travels, which I have linked below, and manages to use such simple photography a small number of images to tell a lot about the places he goes. I think a lot of his photos really fit the saying "a picture is worth a thousand words".


Monday, November 18, 2019

Black and White Photography (my attempt)

Earlier in the semester, I did a blog post about doing black and white photography. I linked an article I read about how it can bring a new perspective to something, eliminate distractions, bring out detail, and create a more powerful image. I mentioned how I wanted to create some black and white shots. So, that's exactly what I did. Below are two examples of it.


This photo I took at Timberline lake early in the semester is an example of a photo where I believe that black and white made it more powerful and striking than it was in color. It lets the viewer focus more on the detail of the rock and clouds.


In this photo, the main reason I made it black and white was that there was a very distracting red/orange reflection on the water. Bringing it to black and white eliminated that distraction bringing the point of focus back to the duck. This also fits well with the minimalist photography which I discussed in another blog post.

Monday, November 11, 2019

The Power of Adobe Lightroom

When you go out for a photoshoot, especially when you are an amateur like myself, it can be difficult to get your picture to look as you intended. This can be because of a number of factors such as aspect ratio, white balance, exposure, color, composition, etc. Luckily, for us in this modern age, where we have digital cameras with flash memory, these problems that make for a less than desirable photo can be fixed relatively easily and conveniently. This is because of a program called Adobe Lightroom Classic. Below I will compare the final edited images from the previous share two and critique compared to their original, completely unedited form.


 As you can see in the second image, I was able to use the lightroom crop tool to remove distracting elements from the frame. I was also able to bring out more detail in the bridge and some of the background trees. Third, I made some adjustments to the basic settings to really bring out the red in the bridge as well as the warm evening colors/lighting.


In this photo, I used the crop tool a lot to get rid of much of the distracting background and foreground and really make the subject the obvious center of focus. I used the saturation and vibrancy tools to bring out the colors. Finally, I used the brush tool to help brighten up the duck and further display it's colors. The editing really improved the quality of this picture by bringing focus to the subject, and bring color to the originally bland picture.

If you end up with photos you don like after a shoot, hope of ending up with something good is not lost. If you know how to properly use it and have a bit of patience, you can use lightroom to make it into something you can be proud of. I believe the photos above prove that point.


My 3 takeaways

The first important thing I learned in this class is the exposure triangle and how to apply it when shooting. Setting my camera in manual mo...