A common debate in photography is whether film or digital photography is better. When it comes to landscape and nature photography there are many photographers that swear by digital for most of their shots as well as many who prefer to use film. With that said, many professional photographers are able to use both effectively. There are tradeoffs with both
Below, I have linked a short article on the Dark Room website that does a photo comparison of digital. They compare landscape photos side by side, the left one being on a film camera and the right photo on a digital one. They claim that they used the same settings in both pictures and that both are unedited. The first difference I notice is the film picture has much more vibrant and rich colors and when I look closer I notice less grain. The article goes on to list the advantages of both digital and film. I will not list all the advantages they mention in the article but it clams that film as advantages such as better detail, higher resolution, being more forgiving with minor focusing issues, and that you have to think about the image more before taking it. The advantages it lists for digital include convenience/instant gratification because you can look at the photos instantly and they can be stored on a small memory card, variable shutter speed between individual shots, built-in filters, and instant and convenient editing.
This article raised a question that it didn't answer, which was why the film camera has advantages like producing a more vivid color picture when unedited with the same settings or why it gives better detail.
Personally, I prefer digital. This is mostly because I am a beginner photographer who is just learning about the different exposure settings and what they do. Being able to snap a photo, look at it, change my exposure settings and take another instantly makes gaining an understanding of exposure and how to manipulate it to get what I want much quicker and easier. Another reason is that the most striking difference between the two compared photos (the vividness of colors) can be changed with filters while taking the shot and/or the easy and convenient editing programs almost instantly after the shot is taken. For now, I will stick with digital, but later on, once I gain an understanding of all the concepts I many try film photography.
https://thedarkroom.com/film-vs-digital-comparison/
Sunday, September 29, 2019
Wednesday, September 25, 2019
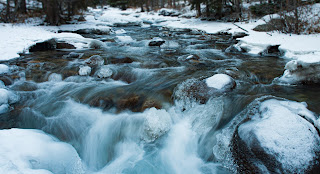
Long Exposure Photography
One of the types of photography that has interested me is long exposure photography. When a photographer uses a long exposure on images such as a stream/river to give the water that white blur effect as it is rushing over rocks or urban photography where passing vehicles appear to just be light trails.
Linked below is an article written by photographer Barry J. Brady on the Digital Photography School website. In this article, he discusses how to go about doing this long exposure photography. He first mentions what you need to do the shots. This includes a camera that has the ability to shoot manual and/or a shutter priority setting, a tripod because the stability of the camera is essential when using long shutter speeds, and he also recommends a cable release so you are not shaking the camera by pressing the shutter release. When it comes to the subject and composure he recommends having a moving element such as water, clouds, or passing cars while everything else is stationary. He then goes into the settings he recommends. First, he says shutter speed should be a few seconds or longer depending on the speed of the moving subject. He recommends an aperture between f8 and f16 depending on how much light there is. he also recommends keeping the iso as low as possible given the lighting conditions. He says the best time for these shots is as the sun is setting or shortly after or early evening when shooting light trails.
Just like Barry states in the article, I think it brings a new perspective to things we see every day. I find these shots beautiful because they capture something the naked human eye could never see. This style of photography is appealing to me and something I would like to do myself.
https://digital-photography-school.com/how-to-do-long-exposure-photography-and-light-trails-at-night/
Tuesday, September 24, 2019
Applying the Exposure Triangle
These four pictures are examples of what can be done with photography when you take into consideration the exposure triangle and use the camera's iso, shutter speed, and aperture settings


The first photo I was attempting to get a clear photo of a passing car (as clear as I could get with the lighting conditions). To do this I used a high iso (1250) to allow more light in but in turn making it grainy. I used a low aperture value (f/3.5) in order to allow more light in. Finally, I went with a middle ground on the shutter speed at 1/30 giving a somewhat clear image of the car. In the second photo, I attempted to mimic the artistic thing some photographers do when doing night photography that involves passing cars. To do so, I dropped the shutter speed to 1 second. This also made it possible to increase the aperture and decrease the iso for less grain and to have more of the image in focus.
For these two photos, I focused on the aperture. In the first one, I set it to a low aperture value which is why the leaves in the foreground are in focus while the trees in the background are blurry and out of focus. In the second photo, I raised the aperture value which brought everything in the photo into focus.
Monday, September 16, 2019
iPhone 11 3 Camera Design
Apple recently announced it's next phone release, the iPhone 11. Along with the base model, Apple is releasing a "pro" version of the phone. One of the features of this pro model is a strange 3 camera design. The article linked below explains the purpose and reasoning behind this design.
The three cameras all work separately, each having a different function.
One lens is the standard 12-megapixel iPhone camera, not much different from the cameras on previous iPhone models. The only remarkable aspect being that each pixel is used in autofocus, something many other cameras don't offer. It also has an f/1.8 aperture improving shooting in low-light conditions.
The other lens, which is a new feature, is a wide-angle lens. This offers a 13mm equivalent focal length which is about 120 degrees, nearly equal to human vision. They decided to stick with the 12 megapixels on this lens as well. It allows less light in, which is normal for a wide-angle lens.
 The third lens, they claim is a telephoto lens, although the article says calling it telephoto is a stretch. It offers a 2x digital zoom which is equivalent to a 56mm focal length. It is being called the "portrait lens" because this zoom makes for high-quality portrait photos when paired with software that automatically blurs the background. It also will include other auto lighting effects.
It will also offer "deep fusion" which takes 9 photos at different exposure and shutter settings, automatically sort them and chooses the best combination. This is for the purpose of improving sharpness and helping to reduce noise in the image. It will also have "night mode" which will use a combination of different exposures and optical stabilization to improve images taken in the dark.
I believe this feature will make for higher quality photos without much effort from the photographer. The wide-angle lens may be exciting to those who are into landscape photography but don't want to buy a dedicated camera and a wide-angle lens. With all that said, I think this will lower the barrier to entry of people mildly interested in photography and possibly bring more people into the art. Whether that is a good or bad thing can be up to you.
https://www.pocket-lint.com/phones/news/apple/149317-iphone-11-pro-cameras-explained
The three cameras all work separately, each having a different function.
One lens is the standard 12-megapixel iPhone camera, not much different from the cameras on previous iPhone models. The only remarkable aspect being that each pixel is used in autofocus, something many other cameras don't offer. It also has an f/1.8 aperture improving shooting in low-light conditions.
The other lens, which is a new feature, is a wide-angle lens. This offers a 13mm equivalent focal length which is about 120 degrees, nearly equal to human vision. They decided to stick with the 12 megapixels on this lens as well. It allows less light in, which is normal for a wide-angle lens.

It will also offer "deep fusion" which takes 9 photos at different exposure and shutter settings, automatically sort them and chooses the best combination. This is for the purpose of improving sharpness and helping to reduce noise in the image. It will also have "night mode" which will use a combination of different exposures and optical stabilization to improve images taken in the dark.
I believe this feature will make for higher quality photos without much effort from the photographer. The wide-angle lens may be exciting to those who are into landscape photography but don't want to buy a dedicated camera and a wide-angle lens. With all that said, I think this will lower the barrier to entry of people mildly interested in photography and possibly bring more people into the art. Whether that is a good or bad thing can be up to you.
https://www.pocket-lint.com/phones/news/apple/149317-iphone-11-pro-cameras-explained
Wednesday, September 11, 2019
I would like to start this blog off by talking about one of my inspirations for landscape and nature photography. His name is Ansel Adams, a famous photographer, an environmentalist, and a conservationist. He grew up in San Fransisco, California and pursued photography as his career after giving up music. He loved to be out in nature and that is where he did all his photography. He started out more locally then expanded to doing photography on his expeditions into the Sierra Nevada mountains in California. Many times he would go on long expeditions with the Sierra Club and use his photography to capture the beauty of the high sierra landscape one of his favorite places being Yosemite National Park. Attached below is a link to a short biography of his life.
 One of the reasons I like and am inspired by him is how he is much like I am when it comes to photography. We both have a love for nature and its beauty. Just like him, much of my photography is done when I go on backpacking trips in the Sierra Nevada mountains of California trying to capture the beauty of the landscapes I come across. Another aspect of his photography style I really like is how he pursued "straight photography" where the final photo showed little evidence of manipulation. This is something that I strive for and want to learn when it comes to my own photography. To the right is my favorite and one of his most famous photos. It is called "Moon Over Half Dome" and really resembles his "straight photography" style.
http://anseladams.com/ansel-adams-bio/
https://www.google.com/search?q=ansel+adams+half+dome&source=lnms&tbm=isch&sa=X&ved=0ahUKEwi35KLyib3kAhVCrp4KHVgdBMIQ_AUIEygC&biw=1536&bih=743#imgrc=zwYssh2lVWWqd
Turnage, William. “Ansel Adams, Photographer - A Biography.” Ansel Adams Gallery, Oxford University Press, 27 July 2016, http://anseladams.com/ansel-adams-bio/.
Subscribe to:
Posts (Atom)
My 3 takeaways
The first important thing I learned in this class is the exposure triangle and how to apply it when shooting. Setting my camera in manual mo...
-
 One beautiful form of photography that I personally love is lightning photography. It is something that I want to capture at some point, but...
 -
 In modern times, with the wide availability of color digital cameras, much of the landscape and wildlife photography is mostly done in color...
 -
 One of the popular landscape photographers I like is Michael Kenna. One of the reasons his work is some of my favorites is his unique style....